
The aim of this tutorial is to provide an introduction and practical guide to the basic principles for those considering studying the lute. This lesson may also be of interest to the modern guitarist wishing to experience the history surrounding the early lute repertoire. So much academic research and scholarly writing is available, it soon becomes clear that, playing the lute is a big subject! This tutorial is designed to give easy access and an understanding to the right hand thumb/index finger technique, with a few handy tips along the way from a modern lutenist.
The Thomas Robinson’s teaching manuscript of 1603 ‘The Schoole Of Musicke’, has inspired me to write this brief resource. I wish to quote from Robinson’s preface and reference his teachings. I always advise folks to go directly to the original source and you can view a digital facsimile of the full manuscript by following the link: http://imslp.org/wiki/The_Schoole_of_Musicke_(Robinson,_Thomas) In the preface, Robinson writes in great detail a method for technique, tuning, holding the instrument and a detailed account of how to read tablature. (Tablature is the musical notation for the lute.) As mentioned above, in this tutorial, I am concentrating on the expected technique of the right hand. I have provided musical examples and practice-aid recordings to help the student get started on a practical level. I have assumed the knowledge of reading the tablature. This is another very large subject area. To pick up the basics for this, I recommend Diana Poulton’s book ‘A Tutor for the Renaissance lute’. You can also download PDF copies of the musical examples in this tutorial for your own convenience.
 Contents:
- Introduction
- Tutorial
Subheadings to the tutorial.
- Guide Notes
- Before you Start
- And Now to the Lute
- Passemezo Galyard
- To Conclude
Introduction
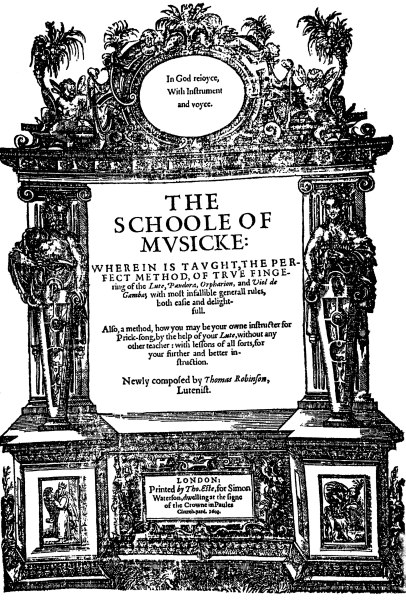
‘THE SCHOOLE OF MUSKICKE: Wherein is taught the perfect method of true fingering of the lute.’
Thomas Robinson, 1603.
As the title page suggests, this teaching manuscript is a real gem for the modern lute player and indeed, for the inquisitive guitarist delving into the repertoire and technique of the instrument. Comprising of mainly Robinsons’ own compositions, 38 in total, coupled with a few popular arrangements of the period, the lute tutor includes 6 very beautiful lute duets, 3 of which are composed upon a ground. One other composed in unions and two duets, A Toy for Two Lutes and A Plaine Song; both of which are constructed of interlocking sections.
Not much detail is documented about Robinsons’ life. His dates are given to be around 1560-1610. Before 1589, Robinson was employed to teach Princess Anne (1574-1619) the daughter of the king of Denmark, Frederick II. John Dowland was also engaged at the royal court of Denmark between 1598-1610, under Christian IV. Dowland, famed not only for his music, but also for his high salary, making him the highest paid court musician of the time.
We know from the title of this book, Schoole of Musicke, Robinson is not just a composer and teacher of the lute but also the cittern, orpharion, bandora, viol and voice. In the final section of the manuscript there is a heading, ‘Rules to instruct you to sing.’ whereby you will find numerous exercises for the viol and voice in unison. Only two other manuscripts by Robinson are known. The New Citharen Lessons 1609, a cittern tutor and Medulla Musicke 1603. The second of the two manuscripts has been lost.
Despite the lack of a background picture of Thomas Robinson, the real clues into this jewel of a renaissance composer of the Golden Age, can be gleaned from the preface of the Schoole of Musicke. The true character of Robinsons’ personality can be pieced together from this worthy introduction. An introduction into some of the most sublime, and quintessentially English lute repertoire that has transcended through the ages.
Written in the form of a dialogue between a Knight, ‘who has children to be taught’ and Timotheus the teacher, this conversation is both informative and humorous! At one point, they discuss the health benefits of learning to play an instrument.
‘But that Musicke is Phisical, it is plainlie seene by those maladies it cureth. As it cureth melancholies it much prevaileth against madnesse. If a man be in paines of the gout, of any wound, or of the head, it much mittigateth the furie ther of’
On another point, (and a point I identify with, as I have two of my children taking music lessons,) the Knight bemoans the cost of tuition, saying:
‘I feare none so much as the last, which is that they (his children) will be carelesse and forgetfull, of so excellent a qualitie as is playing upon the lute.’
The Knight goes on to say, that in his youth he played the lute well but now it is all ‘cleane forgotton!’ Timotheus replies in sympathy, saying that many a man or woman played well in their youth but ‘when they once have beene married, have forgotton all!’ For this, Timotheus blames the ignorance of their teachers!
‘they strove (onelie) to have a quick hand upon the lute, to runne hurrie hurrie, keeping a Catt in the gutter upon the ground, now true then false, shouldering labouring, and sweating, like cart lads, without any skill in the world, or rule.’
Could this book have been written out of frustration? Or was it desire to set down a definitive guide? Robinson presents this tutor articulating how to hold, tune and pluck the strings of the lute. It is these rules I wish to use as the basis for my tutorial for the beginner. It was these rules and principles that made this work one of the most important lute tutors to have been written in England.
Use the audio tracks to help you, and why not play along!
My instrument is a G lute at 440Hz.
I hope you enjoy the lesson and just to help you get started….Robinson has a little advice!
‘For true Art makes hard things easy.
Labour makes hard things perfect.’
Guide Notes
In this tutorial we will be looking in detail at the Passemezo Galyard from Thomas Robinsons’ Schoole of Musicke. This melody line is composed to a ground. I will be concentrating on the treble part only.
There are four audio tracks to help you.
- Track 1 – Robinson’s thumb/index finger exercise.
- Track 2 – Passemezo Galyard. Multi-track version of the treble and ground.
- Track 3 – Passemezo Galyard, treble. Recorded at a moderate tempo.
- Track 4 – Passemezo Galyard, ground x 2. To be used to accompany the treble, once mastered by the student.
A PDF (1) copy of the original tablature and a separate PDF (2) treble part, will be available to print with my own annotated notes. (In coloured ink.)
Before you start
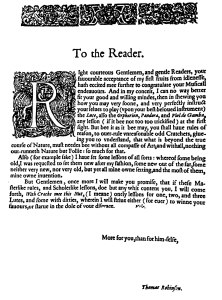
‘To the reader:
I can no way better fit your willing minds, than in showing you how you may very soone, and very perfectly instruct yourselves to play the lute.’
It is obvious, but a point that could easily be overlooked in a rush to get started and that is, the question of the instrument! What sort of lute do I get? Where do I get one? The majority of the solo pieces and duets from the Schoole of Musicke require a 6-course instrument. (The term Course refers to the double strings.) This can be in any key. The beauty of tablature means that you pick up an instrument in a different key for an instant transposition. But, which key is of most use? An instrument in a G tuning is the most versatile. The open strings from high to low are: g, dd, AA, FF, CC or Cc, Gg. Note the octave unison on the last two courses. Robinson believes a good quality instrument is a necessity from the start and I am inclined to agree.
‘First to behoveth a scholer to have a verie good instrument verie well strung, faire to the eie, and easie to reach any stop whatsoever, and verie well sounding.’
Robinsons’ point here is expanded as he believes that although a beginner may not be able to play much to start with, the rich sound of the open strings will encourage them to learn with pleasure. Where as;
‘a bad or dull instrument will quell their spirits, so that in a long time, or never, will they profit in their forced labours.’
A good instrument is required! So now, where to get hold of one? I suggest getting in touch with the Lute Society at www.lutesociety.org. This amazing resource for the modern lute player provides services such as the hire of lutes, a list of lute makers and a small advertisement page detailing lutes for sale and wanted and so much more.
The next basic issue for the beginner is the holding of the instrument. Robinsons’ advice is
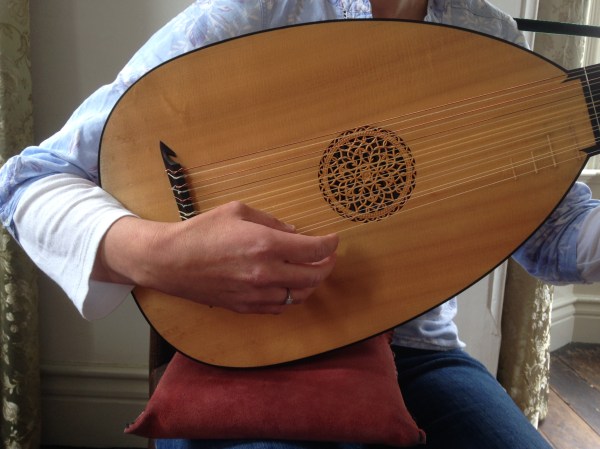
to lean the lute against the edge of the table! This, for me, is not very practical or safe for the instrument. I suggest a strap. I use a ribbon and I tend to go for a double-sided velvet ribbon as it is less likely to slip. I boost my playing position with a square of leather that I have made into a firm cushion, (fig. 1) that way I can have my feet firmly on the ground.
I don’t want to spend time on the complexity of tuning the instrument. It’s a big subject area. A modern lutenist will whip out their iphone and quickly swipe to the Cleartune app. Robinsons’ method is a little more precarious requiring the student to:
‘first set up the Treble (first course) so high as you dare venture for breaking.’
He then suggests to tune accordingly with the top string cranked up to breaking point. I would not advise this! To me, it sounds very expensive, not only in string replacements but also in lute repairs. My advice, get the app!
‘Remember always to keepe your hands cleane, and your nailes short’
The final of my basic points for the novice lute player is the question of the right hand and the issue of nails. Personally, I have always played without nails. However, the evidence can be mixed, and for the classical guitarist charting the use of nails over the centuries, it becomes an interesting investigation.
The Burwell Lute Tutor ca. 1660-1672 on the subject:
‘I have noe need to expresse the hands must be kept white and cleane. And it were better never to play of the Lute than to play with nasty hands. For the nails they must be short and smoothy cut which some doe with a little file.’
Thomas Mace in Musick’s Monument 1676 has this opinion:
‘take notice, that you strike not your strings with your nails, as some do, who maintain the best way of play, but I do not; and for this reason; because the nail cannot draw so sweet a sound from the lute, as the nimble end of the flesh can do.’
The technique and the use of the fleshy pad of the finger to produce a rounded sound, continues through history. Evidence of this can be found in the guitar methods of the 18th-19th centuries.
Giacomo Merchi, Les Guide des ècoliers de guitarre 1761:
‘Take care not to pluck with nails: they produce dry and ungrateful sounds.’
Matteo Carcassi the 19th century Italian guitar virtuoso believed:
‘to obtain a full sound…it is necessary to pluck with the finger tips, avoiding contact between the nails and the strings.’
Finally, Fernando Sor’s Method for the Spanish Guitar 1850 argues the point vehemently:
‘Never in my life have I heard a guitarist whose playing was supportable, if he played with nails.’
The no-nail issue is an important one. The double courses require a simultaneous plucking of both strings in order to get a full and rich sound. This is very hard to achieve with the use of nails, although, not impossible. I’m sure, with much filing and shaping, a tone can be achieved from the nail. But the nail then grows and the tone can be lost. It is important to have control over the sound, allowing the player to express a warmth and intimacy in terms of a musical expression. The only way, I believe, this can be achieved, is to have direct physical contact with the string. Robinson once again;
‘Now you have a good lute, it behoveth you to love it and use it well. For by the useage you shall shew your love, therefore marke how you ought to use your lute, above all things, keepe it from wet, for wet will spoile the strings and make loose the ribs, and when you have done playing upon it, put it up into the case!’
With the basics covered, we are ready to pluck a string!
And now to the lute
In the previous paragraph, we have discussed how the right hand will determine your tone and intention. Robinson then proceeds to explain how to pluck the string, referring to the right hand as the ‘striking hand’. At first, this may seem a simple act, until you decide to develop your own sound. You will need to hone and master many ways of providing an array of ideas through dynamics, arpeggiation, ornamentation and a strumming technique. Think of your right hand as being able to produce many contrasting colours to deploy where appropriate, and especially when playing continuo on the larger lutes and theorbo. I believe it’s worth taking time to analyse the best way to pluck the string right from the start and Robinson is in agreement with me!
The true essence of this technique is the thumb and index finger. The evolution of which can be traced back to the Eastern origins of the lute and the use of the plectrum or quill. The back and forth motion of the quill on the string is later replaced by the strict down-up motion of the thumb and index finger and more importantly, the strong-weak rhythmical effect it creates. One of the first pieces of written evidence of finger plucking and contrapuntal writing can be found in De Inventione Et Usu Musice by Johannes Tinctoris, 1481. Woodcuts and engravings of the last quarter of the 15th century also depict finger plucking. (Fig. 2 & 3)
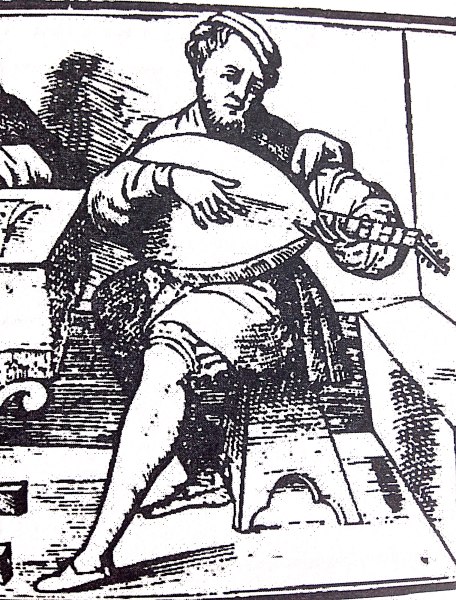
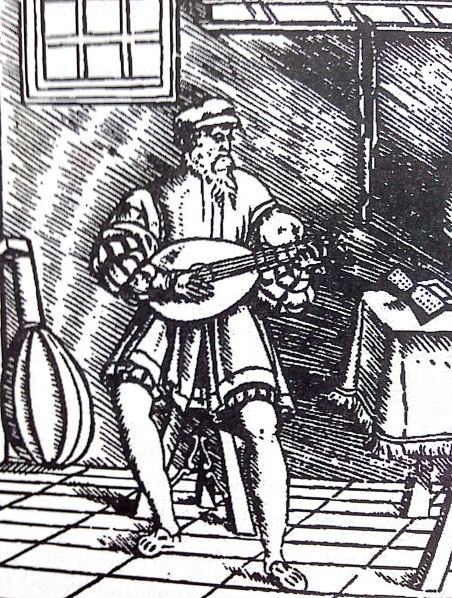
Two woodcuts of lutenists striking the string with the fingers: 1536.
Both are from:
‘Intabolatura Di liuto de diversi..’ Francesca Canova da Milano, Venice.
So, back to Robinson:
‘Now for your right hand, called the striking hand, leane upon the bellie of the lute with your little finger onelie, & that neither to far from the Treble strings, neither to neere.’

As you can see from both of the woodcuts above, the little finger of the right hand rests on the belly of the lute. This, in turn, results in a low-lying position of the right hand. (Fig. 4) Naturally the thumb falls inside the fingers as they stretch parallel to the strings. This thumb-under position is ideal to then execute the thumb-index finger technique that Robinson then goes on to describe:
‘then with your thumb of your right hand (houlding the rest of the fingers straight forth before your thumb)…strik the first string downward with the thumb onelie.’
The thumb moves in a downward motion and then rebounds back into position again. The
thumb is the stronger force than that of the index finger and so is heavier rhythmically. Therefore all strong beats are articulated by the thumb, the weaker up-beats, by the index-finger. Robinson then suggests playing through the open strings with your thumb. But remember, while you are practicing this, your little finger is resting on the belly of the lute. This is important, as you are programing into your muscle memory, the distance between the courses.
The same idea is then suggested for the index-finger. This is more of an upward and backward motion. Again with an almost elastic rebound as it returns back to the string. Robinson describes it slightly differently:
‘this doing so oft, downward and upward…and also striking them (the strings) with the thumb behind the fingers, that you have it most perfect and readie both in mind & fingers.’
It seems at first, a very simple thing to do, but in reality it takes practice and a lot of patience! After many years of playing, the very first thing I do on any instrument is to play through the open strings for at least 5 minutes every day. This way, I can adjust to the type of instrument I’m playing, check the tuning and modify my tone to get the instrument vibrating well.
‘Also that letter which to be striken downward, and if there be a prick under the letter, that letter must be striken upward.’
The next stage is to alternate the thumb and fore-finger. For this, Robinson provides a lovely musical example of a running passage with a simple thumb and index-finger articulation. (Fig. 5) He very carefully notes down the fingering for the left hand. The use of the index finger in the right hand is marked with this sign.
The other notes in the tablature are not marked. These notes are played with the thumb. Note that all the thumb strokes are on the strong first and third beats of the bar. The weaker, second and third beats, are played with the index finger.
Fig 5

Audio Track 1 – Robinson’s thumb/index finger exercise.
‘Doe these points perfectly, not striving at it, but with such ease….and when you are weary, leave it, and go to it againe, but go to it with a willing minde.’
In his preface, Robinson expands his teachings. He discusses fingering for the left hand and he explains, in great detail, how to read tablature and decipher the rhythmical values. Both these areas, for now, I will leave for another tutorial…..if the desire for me to write one is required!
Passemezo Galyard
For this final section of the tutorial, I would like to put the theory of the right hand articulation into practice. I am going to use the duet, Passemezo Galyard from Robinson’s collection of pieces in The Schoole of Musicke. I would like to demonstrate the importance of rhythmic emphasis, brought about by the strong/weak effect of the thumb-index finger technique.

Audio examples are provided. (Tracks 2-4, outlined in the guide notes. See below for links.)
For you own use, a PDF (1) version of the full Passemezo Galyard is available here.
Click on the link below to hear my full audio version of the Passemezo Galyard, played as a duet. This a multi-track recording of the treble and ground bass.
Audio Track 2 – Passemezo Galyard. Multi-track version of the treble and ground.
‘First see what manner of lesson it is, whether it bee a Set Song, Innomine, Pavan, Galliard, Almaine, Jigue, Lavolta, Country dance or Toy, whatsoever, according to the nature of the lesson, to give it his grace with gravitie or quickness’.
As Robinson points out, the title of this piece, ‘Passemezo Galyard’, is very important to understanding the style and character of the duet. A passamezzo is a ground bass. A ground bass is a repeated chordal progression accompanying a melody line. This was a very popular form in the 16th century and was still in use in the 17th century. There are two types of passamezzo, the moderno and the antico, both have slightly different chordal sequences. Robinson’s passamezzo is the antico form, comprising of two phrases. The chord structure is as follows:
I VII I V
III VII I V I
The passamezzo we are using here is in the key of G minor, a typical key of this form. Below is the chord progression.
|| Gmin | Gmin | F | F | Gmin | Gmin | D | D |
| Bb | Bb | F | F | Gmin | Gmin D| G | G ||
Although Robinson has presented a fixed ground to be played twice under the treble line, a performer would not think twice about decorating the ground with their own ideas based on the chordal structure seen above.
The dictionary definition of a galliard states:
‘lively dance, generally in triple time. Takes name from Fr., gaillard, “merry”.’
Collins, Concise Dictionary of Music
Now we have an understanding of the nature of the piece, a merry dance, in three, built upon a repeated chord structure, we can return to Robinson’s preface and look at the right hand articulation in more detail.
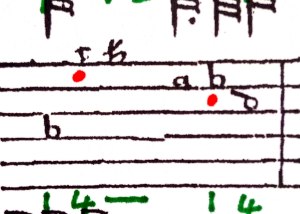
We have discussed the alternation of the thumb and index finger and how this is noted down in the tablature. Robinson marks the first six pieces in the collection very clearly and after, these indications occur only where necessary. As the Passemezo Galyard is the seventh piece in the collection, there are no index-finger markings. Below, I have provided an example of the treble part using a red dot • under the tablature note to indicate the use of the index-finger. I have also added, in green ink, the fingerings I would use for the left hand. These fingerings may vary as all lute players have their own personal opinions on such matters!
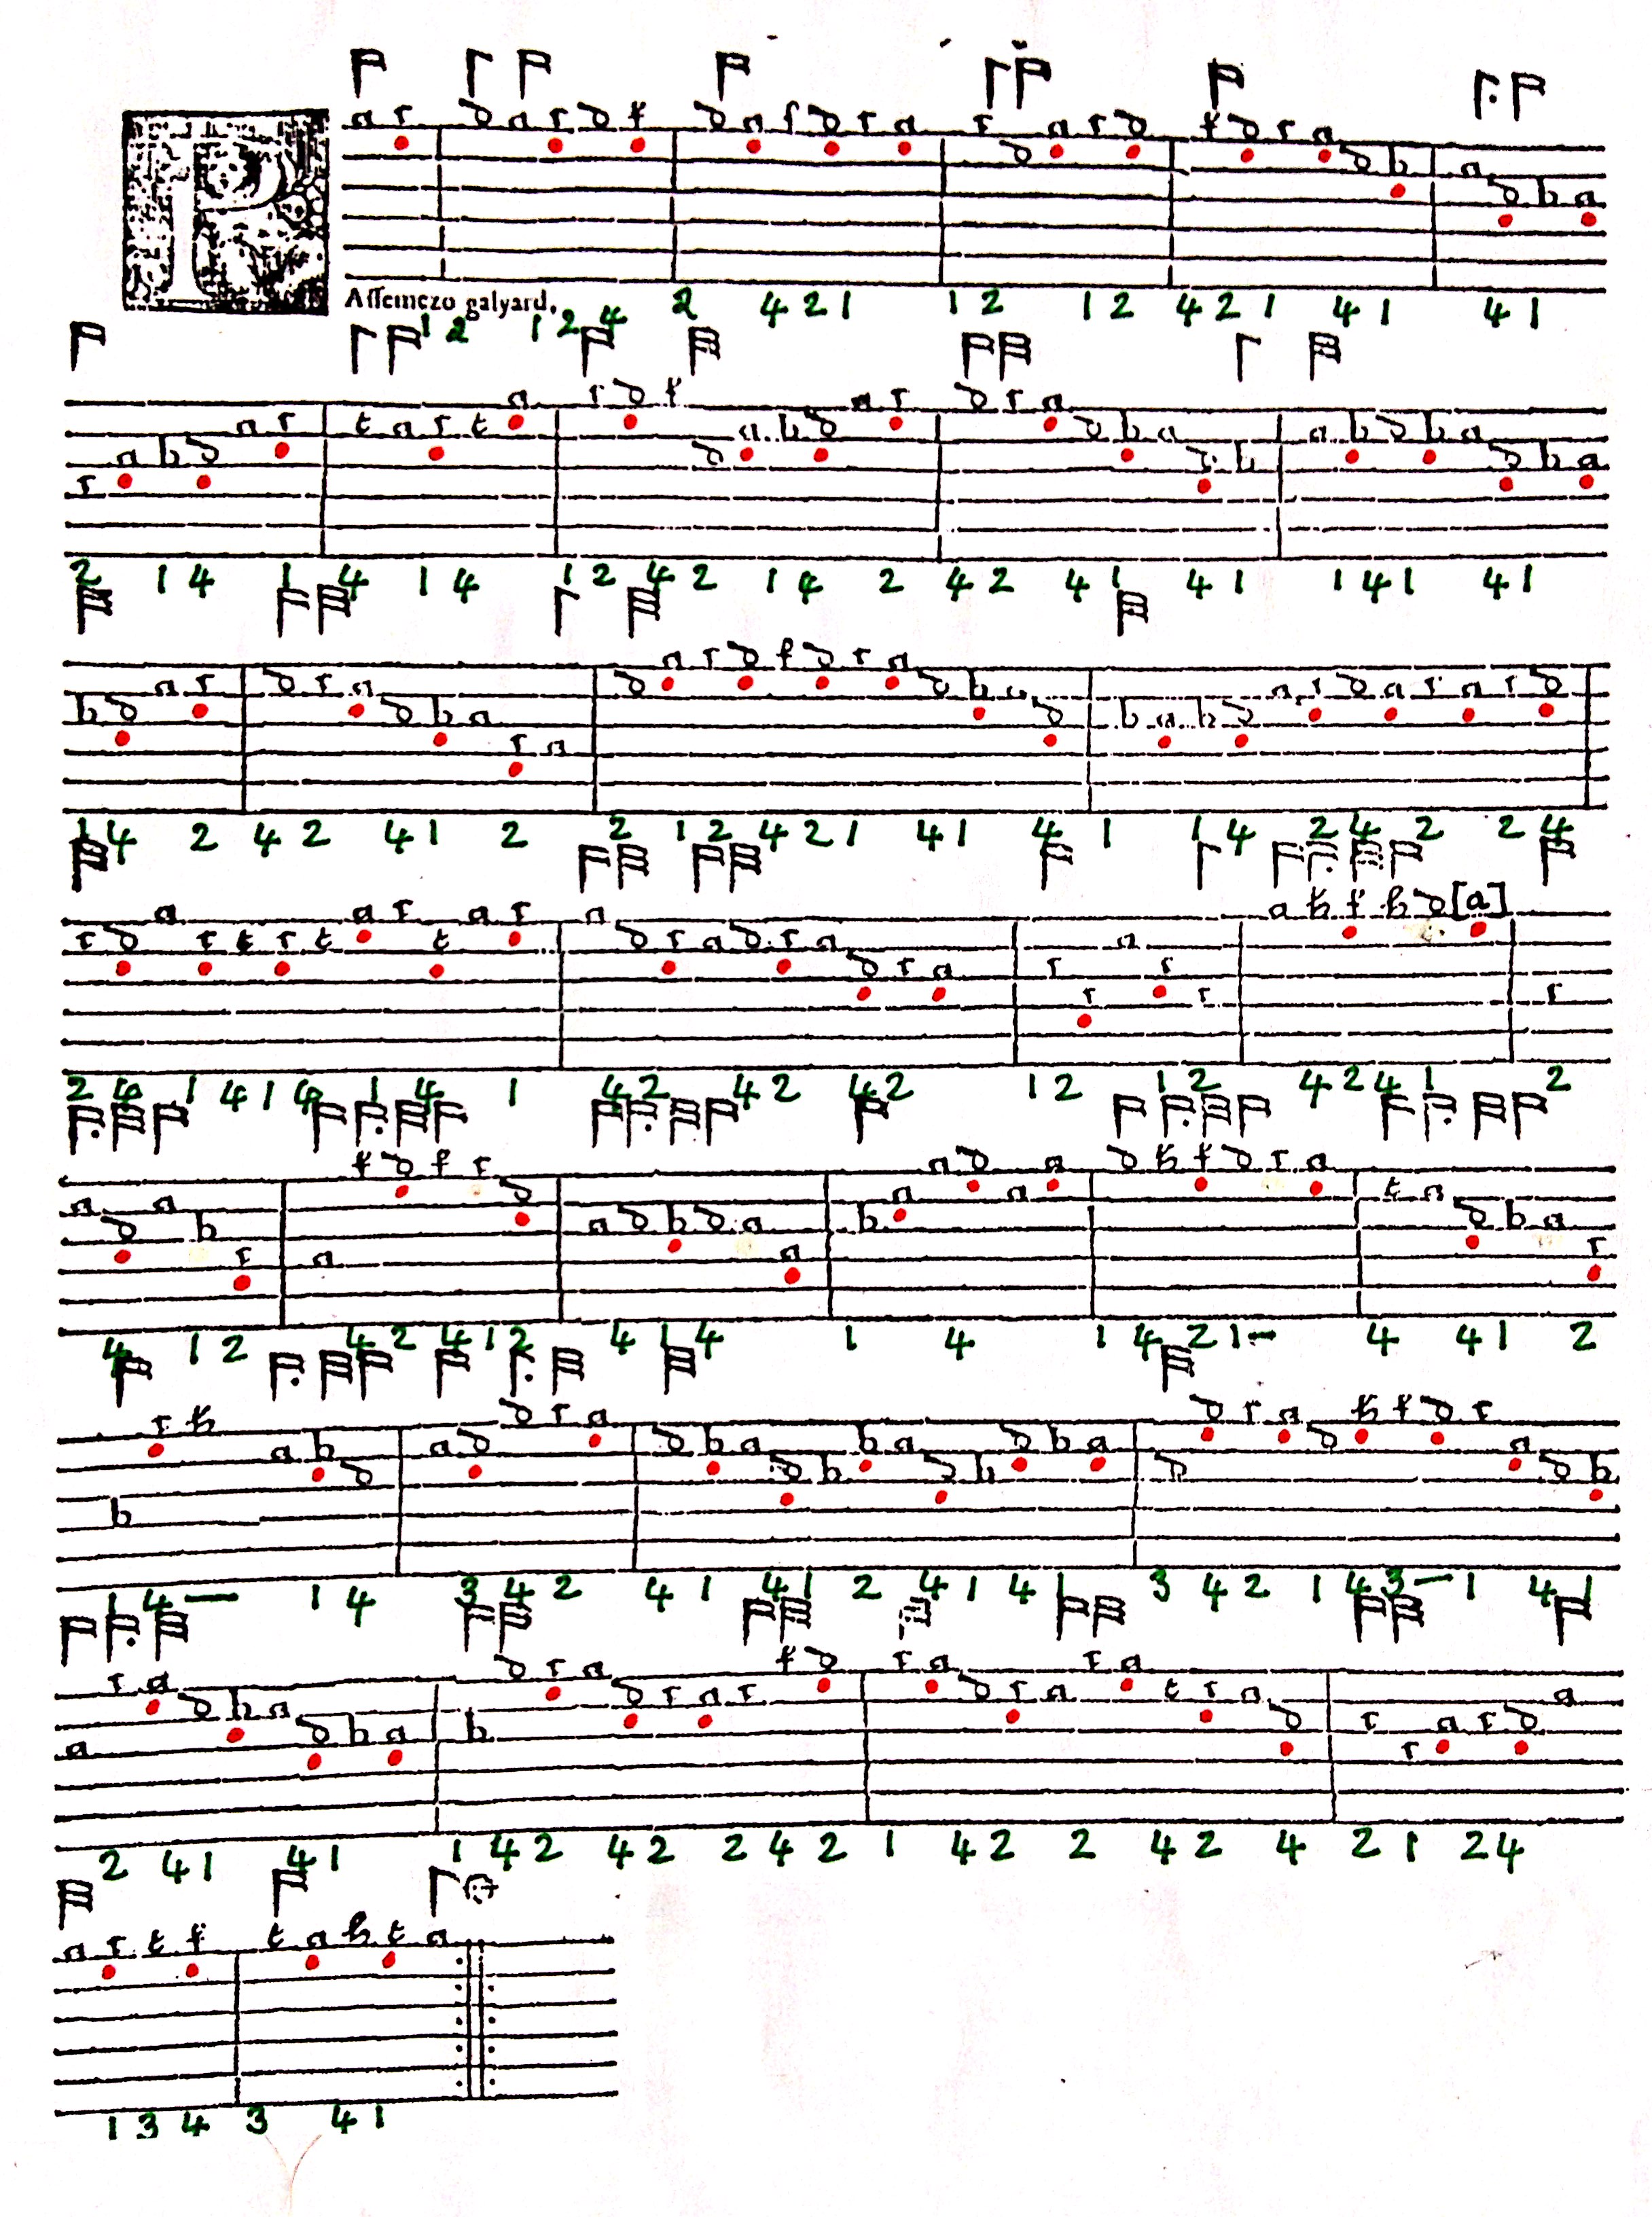
For practice purposes, click on the link to download a PDF (2) of the treble with the annotated notes.
Back to the right hand:
‘Now by this rule, you may by occasion, strike twice down together.’
Robinson’s point here can clearly be demonstrated in the first bar. As we can see, from my own markings, there is a double downward stroke after the up beat in the beginning of the first bar. These strong beats provide rhythmical phrasing and order to the strict down-up articulation. A novice player may well note this pattern happens again in the third bar, but then miss the weak beat needed on the second note of the fifth bar in order for the rhythmical articulation to be ordered in the appropriate sequence. Once you have mastered this idea the technique becomes natural and you will find yourself automatically preparing the double strong beats with the downward stroke.
‘For it is a general rule, that everie stroke, is more natural to be striken downward, than upward.’
Where Robinson presents a problem, you need just a little more patience to practice the cross stringing in conjunction with the articulation. A really good example of this can be seen in bar 16 at the cadence point.
Bar 16-
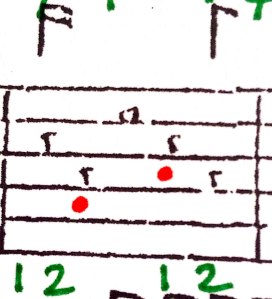
As you can clearly see, the thumb provides the downward stroke on the third course, the index/weak beat on the forth course, followed by the thumb on the second course, and so on. You will also discover that the thumb position, of naturally falling inside the hand, starts to make sense.
Another moment of care in terms articulation occurs between bars 17-20. For this you need to study the rhythmical phrasing.
You can see from this example in bar 17, the rhythm becomes syncopated and so the strong beats must be on the half beats of 1 and 3. The articulation falls as demonstrated with the red dots. This adds to an interesting variation that is then repeated in the next three bars.
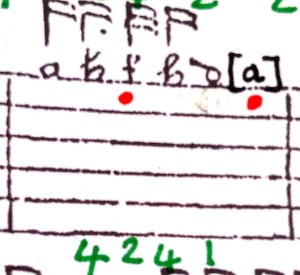
Finally, at bar 24 one must put into practice the
cross stringing, coupled with a leap in the left hand and an unusual articulation phrase. The concluding bars of the treble part to this duet consist of regular scale patterns that, as you get to know the repertoire, you will recognize as being idiomatic for the lute, thus becoming second nature in terms of articulation.
‘..if it be flubbered with a bad touch, or stroke: therefore, let these rules following, be observed diligently, without the which, all fine play of the lute is spoild, and nothing worth.’
I have recorded the treble part at a moderate tempo. Note the points of rhythmical variation discussed. When you are ready, have a go at playing along side the recording. Listen for the 2 bar count in.
Audio Track 3 – Passemezo Galyard, treble.
(Recorded on a G lute at 440Hz)
You could also experiment by playing the passamezzo ground with the audio example of the treble. You can do this by either playing the Gminor chordal sequence above, or you could have a go at playing the ground written in tablature by Robinson. (See PDF (1) for full version of the Passemezo Galyard)
When you feel confident that you can play the treble part without hesitation, try playing it to the passamezzo ground recorded at the same moderate tempo.
Audio Track 4 – Passemezo Galyard, ground x 2
Listen for the 2 bar count in.
Finally, practice the treble part so it becomes fluid. You can then have a go at playing the treble at speed with the second audio example.
To Conclude
This tutorial is a very small step towards discovering a beautiful and fulfilling art form. To play the lute is a life long journey. There are many different subject areas to explore and many related instruments to master. We live in a glorious new age in which digital facsimiles of lute manuscripts and treaties are available at our fingertips via the internet. Scholarly research allows us to make sense of it all. Organizations such as the Lute Society here in the UK www.lutesociaty.org and the Lute Society of America www.lutesocietyofamerica.org help us to connect with makers, players and to share the repertoire. For guitarists, the history of the lute and it’s music can open up a whole new landscape of repertoire ideas and add depth to performance. In our modern society, there has never been a better time to take up lute!
Of course, Robinson has to have the final word.
‘for it is an old saying, that cunning men (and women) are curious, especiallie Musicians.’
Please feel free to email me if you would like to know more about taking up the lute or the Thomas Robinson manuscript or indeed any other aspect of the tutorial.
For my video tutorials and catalogue visit my YouTube Channel
